Pages

Showing posts with label handmade. Show all posts

Monday, October 22, 2018

Miss Piggy - Free amigurumi pattern

Oh, I've never been more excited about something as I am about Miss Piggy right now! As a matter of fact, I'm writing this post in a very much hurry, just to be able to show you Miss Piggy wearing her sweeeet ruffled dress (which, by the way, was recycled from an old shirt). In the same time, I'm giving you the opportunity to make a Miss Piggy of your own, courtesy of Yana Dym Sky, her designer, which allowed me to publish my english notes describing her pattern.

As I said before, my notes are not as detailed as the original tutorial, so if you want further guidance, please watch Yana in action on her youtube channel - you can find the first part of Miss Piggy video tutorial here.


By clicking right here, you will find a short guidance for the abbreviations I'm using. For this doll, I used Clover Amour hook size 2.25 mm, with Catania/Alize Bahar cotton yarn - tight crochet for the body and loose crochet for the dress. I'm not sure about the size of the eyes, maybe 10 mm, but you can experiment with several sizes and decide what's good for you, depending on the size of your finished toy :)

1. HEAD

R1: magic ring, 6sc
R2: 6inc (12)
R3: 1sc, 1inc (18)
R4: 2sc, 1inc (24)
R5: 3sc, 1inc (30)
R6: 4sc, 1inc (36)
R7: 5sc, 1inc (42)
R8: 6sc, 1inc (48)
R9: 7sc, 1inc (54)
R10-R16 (7rows): 54sc (54)
R17: 9sc, (1sc, 1inc)x6, 1ch, skip 1sc, 10sc, 1ch, skip 1sc, (1inc, 1sc)x6, 9sc (66) (insert later the safety eyes in the holes created by skipping 1sc)
R18-R20 (3 rows): 66sc (66)
R21: (9sc, 1dec)x6 (60)
R22: (8sc, 1dec)x6 (54)
R23: (7sc, 1dec)x6 (48)
R24: (6sc, 1dec)x6 (42)
R25: (5sc, 1dec)x6 (36)
R26: (4sc, 1dec)x6 (30)
R27: (3sc, 1dec)x6 (24)
R28: (2sc, 1dec)x6 (18)
R29: (1sc, 1dec)x6 (12)
R30: 6dec (6)
Fasten off, leave long tail for sewing to the body.

2. EARS (make two)

R1: magic ring, 6sc (6)
R2: 6sc (6)
R3: 6inc (12)
R4: 12sc (12)
R5: (1sc, 1inc)x6 (18)
R6: 18sc (18)
R7: (2sc, 1inc)x6 (24)
R8: 24sc (24)
R9: (3sc, 1inc)x6 (30) R10: 30sc (30)
R11: superpose the final row, crochet together 14sc, leave long end for attaching to head.

3. MUZZLE

R1: magic ring, 6sc (6)
R2: (1sc, 1inc)x6 (12)
R3: 1sc, 3inc, 4sc, 3inc, 1sc (18)
R4: 1sc, (1sc, 1inc)x3, 4sc, (1sc, 1inc)x3, 1sc (24)
R5: 1sc, (2sc, 1inc)x3, 4sc, (2sc, 1inc)x3, 1sc (30)
R6: BLO, 30sc
R7: 30sc
Fasten off, leaving long end for sewing to head.

4. BODY

R1: magic ring, 6sc
R2: 6inc (12)
R3: (1sc, 1inc)x6 (18)
R4: (2sc, 1inc)x6 (24)
R5: (3sc, 1inc)x6 (30)
R6: (4sc, 1inc)x6 (36)
R7: (5sc, 1inc)x6 (42)
R8: (6sc, 1inc)x6 (48)
R9: (7sc, 1inc)x6 (54)
R10-R19 (10 rows): 54 sc
R20: (7sc, 1dec)x6 (48)
R21-R22: 48sc
R23: (6sc, 1dec)x6 (42)
R24-R25: 42sc
R26: (5sc, 1dec)x6 (36)
R27-R28: 36sc
R29: (4sc, 1dec)x6 (30)
R30-R31: 30sc
R32: (3sc, 1dec)x6 (24)
R33-R34: 24sc
R35: (1sc, 1dec)x6 (18)


5. HANDS

R1: magic ring, 6sc
R2: (1sc, 1inc)x3 (9)
R3: 9sc
R4-R5: (join the two parts): 18sc
R6-R10: 18sc
R11: 8sc, 1dec, 8sc (17)
R12: 17sc
R13: 8sc, 1dec, 7sc (16)
R14: 16sc
R15: 8sc, 1dec, 6sc (15)
R16: 15sc
R17: 8sc, 1dec, 5sc (14)
R18: 14sc
R19: 7sc, 1dec, 5sc (13)
R20: 13sc
R21: 7sc, 1dec, 4sc (12)
R22: 7sc, 1dec, 3sc (11)
R23: 6sc, 1dec, 3sc (10)
R24: 6sc, 1dec, 2sc (9)
R25: sc a few stitches to be able to fold it the right way, then stitch together to end, leave long ends for attaching to body.

6. FEET

R1: 7ch
R2: from 2nd ch from hook, 5sc, 6sc in last ch, 5sc (16)
R3: 5sc, 6inc, 5sc (22)
R4: 3sc in first sc, 4sc, (1sc, 1inc)x6, 5sc (30)
R5: 1inc, 1sc, 1inc, 4sc, (2sc, 1inc)x6, 5sc (38)
R6: 1sc, 1inc, 2sc, 1inc, 33sc (40)
R7: 40sc, crocheted from the back
R8: 40sc in top 2 loops
R9-R10: 40sc
R11: 4sc, 1dec, 13sc, 1dec, (1sc, 1dec)x4, 7sc, change color
R12: attach middle back, 13sc, 5dec, 11sc (29)
R13: 11sc, 4dec, 10sc (25)
R14: 1dec, 10sc, 1dec, 11sc (23)
R15: 9sc, 3dec, 8sc (20)
R16-R18: 20sc
R19: 1dec, 18 sc (19)
R20: 19sc
R21: 1dec, 17sc (18)
R22: 18sc
R23: 1dec, 16sc (17)
R24: 17sc
R25: 1dec, 15sc (16)
R26: 16sc
R27: 1dec, 14sc (15)
[left leg]
R28: 11sc, 1dec, 2sc
R29: 10sc, 1dec, 2sc
R30: 9sc, 1dec, 2sc
R31: 6dec, fasten off
[right leg]
R28: 3sc, 1dec, 10sc
R29: 3sc, 1dec, 9 sc
R30: 3sc, 1dec, 8sc
R31: 6dec, fasten off

7. DRESS

The dress I used for my Miss Piggy was just designed by me, so I'm presenting you this version. For the original version, please check Yana's tutorial here.

R1: 32ch, turn, slst into the 6th ch
R2: 2ch (counts as dc), 3dc, [1dc, 1ch, 1dc] into next ch, 2dc, [1dc, 1ch, 1dc] into next ch, 8dc, [1dc, 1ch, 1dc] into next ch, 2dc, [1dc, 1ch, 1dc] into next ch, 6dc, turn
R3: 2ch (counts as dc), 1dc, (2dc in next dc)x2, 2dc, 5ch, skip 8 stitches, 1dc, 2dc in next dc, (2sc, 2dc in next dc)x3, 1dc, 5ch, skip 8 stitches, 2dc, (2dc in next dc)x2, 4dc, turn
R4: 2ch (counts as dc), 2dc, 2dc in next dc, 3dc, 2dc in next dc, 1dc, (1dc in next ch)x2, 2dc in next ch, (1dc in next ch)x2, 2dc, 2dc in next dc, 3dc, 2dc in next dc, 2dc, 2dc in next dc, 3dc, 2dc in next dc, 2 dc, (1dc in next ch)x2, 2dc in next ch, (1dc in next ch)x2, 1dc, 2dc in next dc, 3dc, 2 dc in next dc, 2dc, 6ch, turn,
 R5: sc around

Dress shoulders: working on R3, 4dc in first 1ch space, 2dc, (2dc in next dc)x2, 2 dc, 4dc in 1ch space.

Hope you Miss Piggies will turn out just as cute as mine. Thank you, Yana Dym Sky, for the hard work invested in creating this beautiful pattern!

This article is printer friendly. Search for the print button at the end of the article.

Please make sure you read the first part of the amigurumi tips series - how to read the patterns proposed on this blog, before you proceed to making this toy.

If you want to post photos of what you've created following this pattern, there is a group dedicated to Papillon en Papier artwork - Papillon en Papier Wonderland. Join to keep up with my work.

Monday, December 11, 2017

CAL doll Greta - free crochet pattern, PART 5 - DRESS AND SHOES

Here we've come, my friends, to the final part of Greta doll, an original design of Petus Ochoa, who gave me her approval to translate her video tutorials. This is why I recommend, once again, to watch the original videos, for the dress and for the shoes, in order to see how special stitches are done and how, normally, everything should look like. You'd notice I worked just a bit differently from the videos, but the modifications I made should not change very much the outcome.


DRESS

Cluster1: 1dc, 2ch, 1dc into the same stitch
Cluster2: 2dc, 2ch, 2dc into the same stitch/cluster

R1: 34ch, turn
R2: starting in 7th ch from hook, 3dc, [cluster1, 6dc]x3, cluster1, 3dc, turn
R3: 2ch (counts as first dc), 3dc, [cluster2 in the 2ch space of cluster1, 8dc]x3, cluster2 in the 2ch space of cluster 1, 4dc, turn
R4: 6ch, 5dc, 2dc in last dc before the 2ch, 6ch, skip all stitches until next dc after the 2ch of the next cluster2, works 2dc into same dc, 10dc, 2dc in same dc before the next 2ch, 6ch, skip all stitches until next dc after the 2ch of the next cluster2, works 2dc into same dc, 5dc, turn
R5: (work only sc on this row) 1ch, [2sc, 1V] all along, turn
R6: 6ch, 1dc, [skip one stitch, cluster2, skip one stitch, dc] all along, 1dc final, turn
R7: 2ch, [cluster2 in cluster2, 2dc in the dc] all along, turn
R8: 2ch, [cluster2 in cluster2, 1dc, 1dc increase (3dc in total)] all along, join to the other end of the row and then continue working without turning anymore for the following rounds
R9-R16 (8 rounds): the 2ch you make at the beginning of each round should be in the middle of the bottom edge of the triangle between each column of clusters. The triangle shape is formed by adding a dc between each cluster2 on each round, for example, if you have 3dc between each cluster2 on row 8, you will have 4dc between each cluster2 on row 9, 5dc between each cluster2 on row 10 etc ending with 11dc between each cluster2 on row 16. Make a slip stitch at the end of each row. You can work more than just 16 rows if you want.

The final row, R17, is a decorative edge and consists of sc worked from left to right (for the right-handed): please check Petus video for the dress in order to see how it’s done. After you finish the bottom edge, go back to the arm holes and work around them one row of clusters2 separated by 1dc, then add an edge in the same manner as for the skirt. You should obtain 7 cluster2 on each armhole, but it’s no problem if you obtain one more or one less. Add 3 buttons to the back, a button or other decoration on the chest, and then the dress is ready to go on your doll.


SHOES

SOLES – make two of them, in the same color, and don’t fasten off for the second one, if you’re using the same color for the border, like me.

R1: 9ch, 3sc in second ch from hook, 6sc, 3sc in next ch, 6sc, slst into first sc (12)
R2: 1ch, 3V, 6sc, 3V, 6sc (24)
R3: 1ch, [1sc, 1V]x3, 7sc, 1V, [1sc, 1V]x2, 6sc, slst (30)
R4: 1ch, [2sc, 1V]x3, 8sc, 1V, [2sc, 1V]x2, 6sc , slst (36) Prepare a plastic sole that would fit between the two crochet soles, then align them one over the other, making sure the wrong sides of the crochet soles are inside.
Start closing the three-layer sole with a sc row (R5), passing through both loops, for the upper crochet sole, and through one loop, for the bottom sole. Hide the yarn end when you’ve finished and continue with another color.

R6: On the unworked loops of the bottom sole, cast 36sc starting from the same place where you fastened off on R5, for the left shoe, and 18sc further for the right shoe, slst into the first sc (36)
R7-R9: 36sc, slst (36)
R10: left shoe: 6sc, 1hdc, 6 dc decreases worked together (see Petus video to understand how it’s done), 1sc to secure it, 1hdc, 16sc, slst
right shoe: 18sc, 1hdc, 6 dc decreases worked together, 1sc to secure it, 1hdc, 4sc, slst
both shoes: in order to make the strap, 17ch, then starting from the second ch from the hook, work 1sc in the 3rd loop of each chain (the one in the back) up to the beginning (16sc), then slst into the next stitch. Fasten off.

BOW: in magic ring, 3ch, 4dc, 3c, slst, 3ch, 4dc, 3ch, slst, secure the magic ring and with the free yarn end, cover the middle of the bow a few times. Attach to the strap with glue or using the yarn ends. I added some clips on the shoes and on the straps, in order to make them removable.


My strawberry doll adores them! Thank you all for joining this CAL, and hope to see you again on the next one! :)


This article is printer friendly. Search for the print button at the end of the article.

Please make sure you read the first part of the amigurumi tips series - how to read the patterns proposed on this blog, before you proceed to making this doll.

If you want to post photos of what you've created following this CAL, there is a group dedicated to Papillon en Papier artwork - Papillon en Papier Wonderland. Join to keep up with my work and CALs.

Find the first part of the CAL - the hands, here.

Find the second part of the CAL - the legs, here.

Find the third part of the CAL - the body and head, here.

Find the fourth part of the CAL - the assembly, here.

Thursday, December 7, 2017

CAL doll Greta - free crochet pattern, PART 4 - ASSEMBLY

My life is so busy lately, that I must confess - I cheated other priorities in order to help you finalize your Gretas before Christmas. So, here is my method for joining the parts together.

First step, you need to gather all the parts and tools together, as shown in figure 1. You will need a long needle, some buttons, strands of yarn - body and underwear colors, and pins. In figure 1, left, I highlighted the shape of the doll seen from the side - it has a curve at the back, given by the decreases on rows 19 and 20, and a curve on the face, given by decreases on rows 55 and 56 - those curves represent the bottom and the face.


Second step, you will pin-mark the first and last decrease on row 19, to help you decide next where the joining points will be, as illustrated in figure 2:
- in order to attach the legs, mark 7th and 9th rows on the underwear and 7th row from above on the legs;
- in order to attach the hands, mark 6th row from the neck, on the body, and 5th row from above on the hands.


To realise the joinings, I will explain how I did it for the legs. I passed the yarn through the needle, then I passed the needle through both holes of one button. Then, I inserted the needle into the left leg of the doll, as close as I could to the pin. I removed the pin while I was passing the needle to the other side. Then, I inserted the needle through the marks on the 9th row of the body, from my right to my left. Then, I took the right leg of the doll and passed from right to left, according to the mark. Next, I passed my needle through both holes of the second button, and executed a return to the first button on the opposite side of the doll. On the legs, I had to punch in the same place, but making sure I didn't meet the coming strand of yarn (in order to avoid tangles and allow pulling). On the body, I punched through marks on row 7. At the end of this operation, your legs should look like in figure 3. Then, you will take both yarn ends and pull as tight as you can (you may want to press from the side of the doll) until you obtain some kind of "V shape" for the underwear. In fact, it should look similar to plastic doll joints. Then, fasten off and hide the ends into the left leg.


Do similar for the hands. Then mark the belly and the bottom as pictured in figure 4, on row 15. Take the needle with white yarn , insert it from the bottom to the belly. Come back to the bottom from row 14 near the belly. Then, insert the needle into the magic ring between the legs, and come back once again to the bottom mark. Fasten off and hide the ends.


You may shape further the face as I did in figure 5 - I marked the places where I wanted the eyes and corners of the mouth, and, inserting the needle from the back of the head, I went from the left eye to the left mouth corner, then to the right mouth corner and right eye, going out through the back of the head, the same place where I entered. Pulled, fastened off and hid the ends.


For the small doll, I chose painted eyes on fabric. For the bigger doll, I used safety eyes from Aliexpress.

As I finished to decorate her head, I also present you the half-naked Lumi doll. She is some kind of self-portrait, although she looks more like me without the braids. One of the next days I will post the dress and shoes pattern, as soon as I will make them for my Lumi.


Have fun!


This article is printer friendly. Search for the print button at the end of the article.

Please make sure you read the first part of the amigurumi tips series - how to read the patterns proposed on this blog, before you proceed to making this doll.

If you want to post photos of what you've created following this CAL, there is a group dedicated to Papillon en Papier artwork - Papillon en Papier Wonderland. Join to keep up with my work and CALs.

Find the first part of the CAL - the hands, here.

Find the second part of the CAL - the legs, here.

Find the third part of the CAL - the body and head, here.

Find the fifth part of the CAL - the dress and shoes, here.

Sunday, October 29, 2017

Pikachu girl - free crochet doll pattern

I am very happy to finally present you my Pikachu girl, following a free pattern by Handmade by Mrs Owl, Milena Sova by her real name. She has a youtube channel where she presents her doll patterns and not only - she also shares tips, advises and all sorts of secrets related to crochet and how to design a doll or an amigurumi.

I find her work not only amazing, but also perfect - perfectly designed, perfectly documented and perfectly presented. I couldn't ask for more and, besides, all this knowledge she offers for free! She is filming her tutorials in russian, but she added subtitles in english to all the videos, for a worldwide reach. 

I must admit that, at first, I was circumspect about working my dolls wrong side out. But luckily Milena succeeded to convince me to overcome this aspect, and here it is, my first doll - the Pikachu girl. She was worked with Alize Bahar for body and Catania Originals for clothes and accessory, using a 2 mm Clover Amour hook. She is approximately 32 cm tall and is wearing painted eyes and wool hair. I am so in love with the result! How do you guys find her? :)

Check more photos of Pikachu girl in the facebook post.


Saturday, October 21, 2017

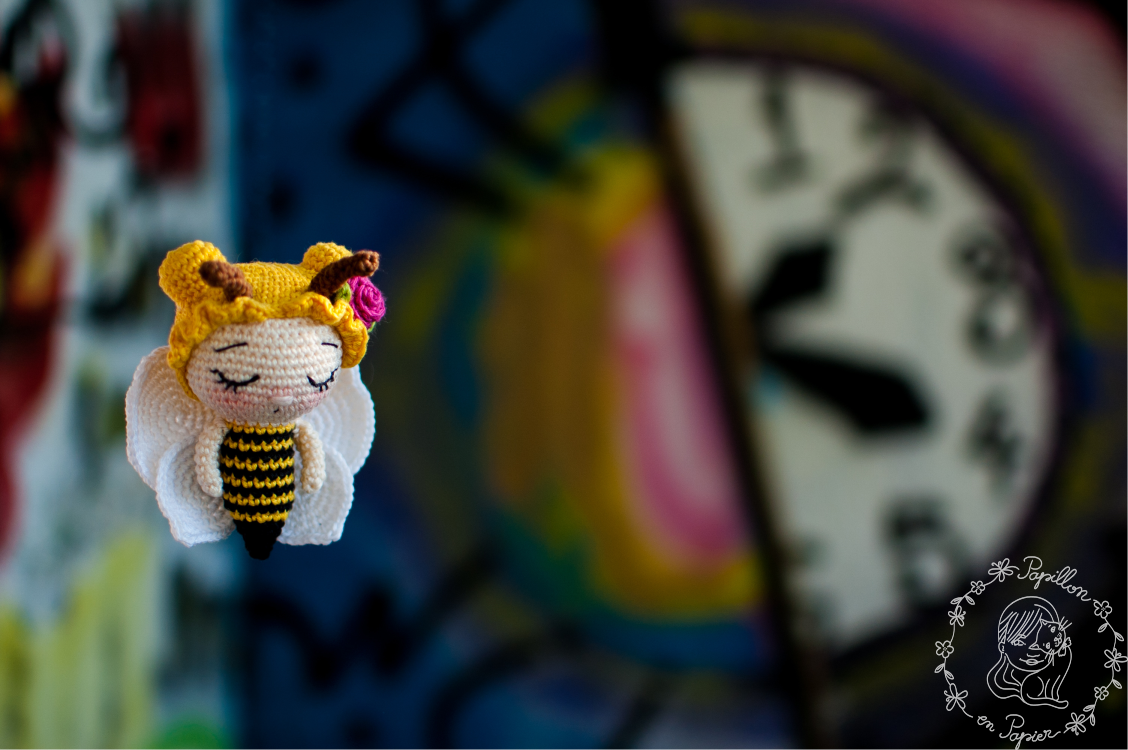
Little honey bee - free amigurumi pattern

Knottellaa is a dollmaker that I admire very much. She even has an exclusive page for sharing her knowledge with the world, Knottellaa Academy. Unfortunately, her master classes are only in arabic...  Even so, I've been quite happy to discover that earlier this year she broadcasted a live video on facebook, featuring the making of "a mistery doll". Which was this very little bee, and I must confess it is really the most wonderful amigurumi I have ever made by now!

I've been struggling almost an entire day to keep up with Knottellaa (because I hardly understand arabic), and meanwhile I took notes, which I share with you bellow. The truth is the world needs more cute little bees like this one :)


I worked with Catania Originals cotton yarn and a 2 mm crochet hook. By the way, I use a Clover  Amour hook and I'm totally in love with it! It's worth all the money!

Body and head

R1. (in black) 6sc in magic ring
R2. 6 sc (6)
R3. 6V (12)
R4-R5. 12 sc (12)
6. (in yellow) (1sc, 1V)x6 (18)
R7-R16. (alternating black&yellow) 18 sc (18)

Fasten off, change for cream/off white.

R17. 18sc (18)
R18. (2sc, 1V)x6 (24)
R19. (3sc, 1V)x6 (30)
R20. (4sc, 1V)x6 (36)
R21. (5sc, 1V)x6 (42)
R22. (6sc, 1V)x6 (48)
R23-29. 48sc (48)
R30. (6sc, 1X)x6 (42)
R31. (5sc, 1X)x6 (36)
R32. (4sc, 1X)x6 (30)
R33. (3sc, 1X)x6 (24)
R34. (2sc, 1X)x6 (18)
R35. (1sc, 1X)x6 (12)
R36. 6X

Fasten off.

Cap (in yellow)

R1. 6sc in magic ring (6)
R2. 6V (12)
R3. (1sc, 1V)x6 (18)
R4. (2sc, 1V)x6 (24)
R5. (3sc, 1V)x6 (30)
R6. (4sc, 1V)x6 (36)
R7. (5sc, 1V)x6 (42)
R8. (6sc, 1V)x6 (48)
R9-R16. 48sc (48)
R17. (4hdc in one sc)x8, 4slst, (4hdc in one sc)x8, fasten off.

Buns (yellow)

R1. 6sc in magic ring (6)
R2. 6V (12)
R3. (1sc, 1V)x6 (18)
R4-R6. 18 sc (18)
Fasten off.

Hands: 6 sc in magic ring, 36 sc around, in spiral.

Antennae: 4 sc in magic ring, (working wrong side up, in spiral), 28 sc.

Small wings

R1. 6sc in magic ring
R2. 6V (12)
R3. (1sc, 1V)x6 (18)
R4. (2sc, 1V)x6 (24)
R5. Left wing – 1 sc, (1V, 3sc)x3, [1hdc, 2dc, 1hdc] in one stitch, (3sc, 1V)x2, 2sc
Right wing - 1 sc, (1V, 3sc)x1, [1hdc, 2dc, 1hdc] in one stitch, (3sc, 1V)x4, 2sc

Big wings

R1. 6sc in magic ring
R2. 6V (12)
R3. (1sc, 1V)x6 (18)
R4. (2sc, 1V)x6 (24)
R5. (3sc, 1V)x6 (30)
R6. (4sc, 1V)x6 (36)
R7. Left wing – 2sc, (1V, 5sc)x3, [1hdc, 2dc, 1hdc] in one stitch, (5sc, 1V)x2, 3sc
Right wing – 2sc, (1V, 5sc)x1, [1hdc, 2dc, 1hdc] in one stitch, (5sc, 1V)x4, 3sc

The rose is also a free pattern, courtesy of Happy Berry Crochet. I used this pattern to embellish also my little snail girl.

I hope you will enjoy making this little adorable Honey Bee! You can publish your creations on the exclusive facebook group, Papillon en Papier Wonderland. And I can't wait to hear your opinion on Little Honey Bee's walk through the park!


This article is printer friendly. Search for the print button at the end of the article.

Please make sure you read the first part of the amigurumi tips series - how to read the patterns proposed on this blog, before you proceed to making this doll.

Sunday, October 15, 2017

CAL Doll Greta - free crochet pattern, PART 2 - LEGS

This article is printer friendly. Search for the print button at the end of the article.

Please make sure you read the first part of the amigurumi tips series - how to read the patterns proposed on this blog, before you proceed to making this doll.

If you want to post photos of what you've created following this CAL, there is a group dedicated to Papillon en Papier artwork - Papillon en Papier Wonderland. Join to keep up with my work and CALs.

I am astonished about how this CAL was received - with so much enthusiasm and excitement! Therefore, I didn't want to delay too much the posting of the second part, so I worked hard to finish my little legs in order to share with you the next stage of this CAL. The hard part is that I work on two dolls at the same time, but I know that eventually this work will pay off and these dolls will become my two wonders!


Let's proceed with the legs!

The video for making these legs is found here.

Unlike Petus, the designer of this doll, I chose to reinforce my doll with copper wire. If you choose to use it too, you should curl the wire at the ends, just like we did with the hands. However, at the closing end, this curvature should be bigger, as illustrated in the picture bellow (g). Also, don't be afraid to use "men" tools, the name by which these pliers would be more familiar to most of you :) I use it to pull easier the needle through the work, when I want to hide yarn ends inside the body or when I embroider the eyes, but also to shape the copper wire.

I added two extra rows and knees to the original legs pattern :)

In "sock" color (white, in my case):

R1. 8ch, start in second chain from hook, 3sc in same ch, (return) 5sc, 3sc in same ch, 5sc (16)
R2. 3V, 5sc, 3V, 5sc (22)
R3. (1sc, 1V)x3, 6 sc, 1V, (1 sc, 1V)x2, 5 sc (28)
R4. (2sc, 1V)x3, 7sc, 1V, (2sc, 1V)x2, 5sc (34)
R5-R7. 34sc (34)

After R7, because I'm planing to make a different shoe model than the original, I inserted plastic soles  (cut to measure) inside the bigger feet (picture (a)), so that the doll will stand by herself even when not wearing shoes. For smaller feet this step is not compulsory, as the original pattern for the shoes (which I will post in the next stage of the call) does include using plastic soles.

R8. 15sc, (1X, 1sc)x5, 1X, 2sc (28)
R9. 4sc, 1X, 1sc, 1X, 6sc, 6X, 1sc (20)
R10. 1X, 8sc, 1X, 2sc, 2X, 2sc (16)

At this stage, you should insert your copper wire and begin stuffing the feet (picture (b), (c), (d)).

R11. 16sc (16)
R12. (3sc, 1V)x4 (20)
R13-R14. 20sc (20)
R15. (4sc, 1V)x4 (24)
Finish off. Keep the yarn end on the outside, if you want to make a crochet border to the sock. At this stage, legs should look like in picture (e).

In skin color:

R16. 24sc in BLO (24)
R17. 24 sc (24)
R18. 6sc, 1V, 2sc, 1V, 14sc (26)
R19-22. 26sc (26)
R23. 7sc, 1X, (1sc, 1X)x2, 7sc, 3V, 1sc (26)
R24. 26sc (26)
R25. 7sc, 1V, (1sc, 1V)x2, 7sc, 3X, 1sc (26)
R26. 26sc (26)
R27. 11sc, 1V, 14sc (27)
R28. 27sc (27)
R29. 12sc, 1V, 14sc (28)
R30-R36. 28sc (28)
R37. 7sc, 1X, (4sc, 1X)x2, 7sc (25)
R38. (3sc, 1X)x5 (20)
R39. (2sc, 1X)x5 (15)
R40. (1sc, 1X)x5 (10)
R41. 5X
Finish off. Hide the yarn end inside the body.

Sock edge: Using the yarn end left outside after finishing the sock, work in front loops of R16 around the leg - 2sc, (3ch, 2sc)x11, 3ch. Cut yarn and finish off.

Bellow there are some photos I took during the legs making process.


This is your finished little leg. Should I remind you how the finished doll, following this pattern, is likely to look at the end? :)


Find the first part of the CAL - the hands, here.

Find the third part of the CAL - the body and head, here. 

Find the fourth part of the CAL - the assembly, here.

Find the fifth part of the CAL - the dress and shoes, here.

Saturday, October 7, 2017

CAL doll Greta - free crochet pattern, PART 1 - HANDS

This article is printer friendly. Search for the print button at the end of the article.

Please make sure you read the first part of the amigurumi tips series - how to read the patterns proposed on this blog, before you proceed to making this doll.

If you want to post photos of what you've created following this CAL, there is a group dedicated to Papillon en Papier artwork - Papillon en Papier Wonderland. Join to keep up with my work and CALs.

As I said before, I kinda fell in love with this doll, Greta, designed by Petus Ochoa. So, while working in parallel on two dolls using the same pattern, but different kind of yarns, I thought - why not organizing a Crochet ALong, or CAL on short, with you? I think it would be so much fun! 

So, for the beginning, we will start with the hands. First of all, let me share the list of materials you will need for making them:
  • cotton yarn; I used mercerized Alize Bahar yarn, with a 2 mm crochet hook, and Super Must Have from Wool Warehouse, which is also mercerized, but has an unmercerized look (it is matte, unlike Bahar, which has a silky look). Super Must Have is a chunky yarn, but I managed to work it using a 3 mm hook.
  • copper wire; I got mine from electric wires, by detaching the plastic cover with a cutter. Unfortunately, I haven't found a smaller thickness than 1.5 mm in diameter, but recently I found a resource in copper wires used in piano chords - these range from 0.5 mm to 1.5 mm. Choose the wire thickness in accordance with your doll size.
  • stuffing; I use a local romanian brand, which seems like a genius invention for toys stuffing - Superball® - it is made of tiny stuffing balls which help maintaining the toys shape in time. I recommend you find a similar brand to use for your toys.
  • needle, stitch marker (may be a small safety pin).

Terms and definitions:

sc - single crochet
V - increase
X - decrease

Let's get started!

I advise you to also take a look at the video on these hands made by Petus Ochoa, the designer of this doll - even if she is speaking Spanish, the images are self explanatory.

Start with the fingers (after each finger you will cut the yarn and finish off, except for the fingers mentioned on the hands instructions):
(a) make 3x2=6 fingers by this pattern:
1. 5sc in magic ring
2. 15 sc, working in spiral around the first 5sc (3 rounds)
(b) make 1x2=2 fingers by this pattern:
1. 5sc in magic ring
2. 12 sc working in spiral
(c) make 1x2=2 fingers by this pattern:
1. 5sc in magic ring
2. 10 sc working in spiral

Create the hands:
R1. (the first stitch on R1 for each finger is the first stitch after the last stitch performed for making it, work in spiral)
- for right hand, prepare 3 (a) fingers) and one (c) finger, then make a (b) finger, but don't cut the yarn at the end! At the end of the 12 sc, make 3 more sc, then, working with a (a) finger at a time, only perform 2 sc in each of the first two (a) fingers, on the third (a finger), work 5 sc (all around the finger), then returning on the first two (a) finger, work the remaining 3 sc in each, and another 2 sc on the (b) finger. You will have performed 20 stitches on this row. With the next stitch, you will begin R2, mark the beginning of the rows from now on.
- for the left hand, prepare 2 (a) fingers, one (b) finger and one (c) finger, then make another (a) finger and don't cut the yarn. Make 3 more sc on this finger, then attach, performing 2 sc on each, two (a) fingers. Last, attach the (b) finger and perform 5 sc around it. Return on the other two finger performing the remaining 3 sc on each, and finish with 2 sc on the starting (a) finger. You will have performed 20 stitches on this row. With the next stitch, you will begin R2 - mark the beginning of the rows from now on.
R2-R4. 20sc (20)
R5.
- for right hand, 8sc, attach (c) finger with 3sc, 9sc (20)
- for left hand, attach (c) finger with 3sc, 17sc (20)
R6-R8. 20sc (20)
R9. 10X (10)
It would be useful to perform the "inserting the wire" and "stuffing of the hand" stage after a few decreases, during R9. Use the image bellow to shape the copper wire - approximate the length of the wire skeleton by the size of your obtained hand. Use a waterproof adhesive tape to secure the ends of the wire.


Continue with the arms (still working in spiral):
R10. 10sc (10)
R11. 2sc, 1V, 3sc, 1V, 3sc (12)
R12. 12sc (12)
R13. (3sc, 1V)x3 (15)
R14. 15sc (15)
R15. 6sc, 1V, 5sc, 1V, 2sc (17)
R16-R18. 17sc (17)
R19. (2sc, 1X)x4, 1sc (13)
R20. 13sc (13) 21. (2sc, 1V)x4, 1sc (17)
R22-R28. 17sc (17)
R29. 6sc, 1X, 7sc, 1X (15)
R30. (3sc, 1X)x3 (12)
R31. 6X

Cut the yarn end, leaving a long tail. With the needle, finish off and hide the yarn end inside the arm.

This is it! Enjoy your little pair of hands until the next stage of the CAL! :)


As a reminder on how it would look like at the end, bellow you have one of the two dolls that I already have done using this pattern - her name is Alesia.


Find the second part of the CAL - the legs, here.

Find the third part of the CAL - the body and head, here.

Find the fourth part of the CAL - the assembly, here.

Find the fifth part of the CAL - the dress and shoes, here.

Wednesday, March 15, 2017

Papillon en Papier - Playful handmade boutique - văzut de IQAds

La începutul acestui an, am fost contactată de către IQAds pentru o apariție pe site-ul lor, sub formă de interviu online. M-am bucurat nespus că am reușit să captez atenția prin creațiile mele din ultimele luni și, mai ales, că prima apariție media a acestui proiect este și una de o atât de mare amploare. Astfel, am căpătat mai multă încredere în mine și în ceea ce pot să fac, și îi mulțumesc pe această cale Alexandrei Aliman. Cel mai mult mi-a plăcut cum a făcut ea referință la Crăciun (nu cel trecut, ci viitor), îndemnând cititorii să se servească cu idei de cadouri încă din ianuarie :) Mai jos aveți interviul în același format în care a fost publicat și pe site-ul IQAds.


Mă declar un stalker împătimit al Facebook-ului. Câteodată și eficient. Cu lupa la purtător, purced în online și găsesc oameni pe care îmi vine să-i iau la întrebări. S-o cunoaștem pe Luminița Cristina în cazul ăsta, de meserie ofițer inginer, care printre altele, își ocupă timpul manufacturând la proiectul Papillon en Papier. De 4 ani croșetează, coase sau colorează genul de jucării sau accesorii pe care nu le mai găsești decât online, la târgurile sau magazinele cu profil handmade. Am vorbit despre proiectul ei, despre încotro se îndreaptă treaba asta cu lucrul manual la noi și despre planurile ei de viitor. De asemenea, dacă vreți inspirație pentru cadourile de Crăciun, n-aveți decât să va serviți timpuriu.

Despre Luminița Cristina

De meserie, sunt ofițer inginer. Am terminat liceul militar și mai apoi, una dintre cele câteva academii militare, și anume cea tehnică. Profesional, mi-am început cariera în domeniul cercetării, lucru care m-a determinat să mă înscriu și la doctorat. Momentan sunt foarte aproape de finalizarea tezei, iar în paralel urmez un curs de pregătire didactică, pentru a putea preda în cadrul universității după absolvire.


Papillon en Papier: când și cum?

Papillon en Papier a fost de fapt o transformare. Înainte de handmade, pe blogspot postam fotografii artistice, încercând să evit aglomerarea blogului meu principal, care era axat pe texte. Am gândit numele astfel încât să sugereze efemeritatea experiențelor pe care le acumulăm de-a lungul vieții (papillon – fluture) dar care pot rămâne în memoria noastră prin intermediul fotografiilor (en papier – din hârtie, pe hârtie).


Reprofilarea a venit un pic mai târziu – în general, cariera militară nu mi-a oferit foarte multe momente de respiro în perioada studiilor, așa încât atunci când am început să lucrez efectiv, să am un salariu și un program bine definit, am simțit nevoia să îmi colorez timpul liber cu activități creative. Am cochetat inițial cu origami, iar mai apoi am descoperit tehnica tatting (sau frivolite) – dantelărie pe ac. Din aproape în aproape, am descoperit croșetatul, a fost prima dată când am auzit de acest termen, m-am documentat, mi-am încercat îndemânarea și m-am îndrăgostit iremediabil. În parte, deoarece se află printre puținele tehnici care nu pot fi încă reproduse cu ajutorul tehnologiei.


Am fost atât de încântată încât am simțit nevoia să împărtășesc acest lucru. Atunci mi-a venit ideea transformării – blogul principal îl abandonasem de ceva vreme, iar cel cu fotografii nu prea mă caracteriza, așa că am șters tot ce postasem anterior și am început să îmi expun activitatea handmade, în forma pe care o vedeți astăzi.

Ce alte skill-uri?

Toată treaba asta se întâmplă deja de aproape 4 ani. O perioadă am croșetat intensiv, asumându-mi proiecte destul de mari și de grele: un poncho, o rochie, mai multe bluzițe și veste, șaluri. Nu vă spun câte proiecte au rămas la stadiul de WIP (work in progress) sau au fost chiar abandonate! De asemenea, am multe creații pe care nici măcar nu am apucat să le fotografiez și postez.


Cât despre partea de skill-uri, simt că am o afinitate pentru lucrul de mână; am încercat în ultimii 3 ani cam tot ce se putea încerca în materie de DIY. Într-un articol, am ilustrat partea de investiție ce susține toate aceste activități: pe lângă fire, croșete, foarfeci, ace, materiale textile, mașina de cusut și de decupat, îți mai trebuie și cărți și reviste de specialitate, licențe de softuri, culori speciale pentru textile, ceramică, unelte pentru sculptat ștampile și multe alte materiale, pe care uneori și uit că le am. 


Produsele: tipuri și etapele de producție

Majoritatea lucrușoarelor realizate de mine sunt croșetate, fie că ne referim la obiecte vestimentare sau jucării. Încă nu mi-am exersat talentul de designer, așa că pentru a realiza un obiect croșetat, am în primul rând nevoie de un pattern. Încerc însă de fiecare dată să-mi aduc nota personală printr-un detaliu.

Pentru restul creațiilor, mă inspir de pe Pinterest și de la alți artizani, români sau străini. Având și un job stabil, nu am avut timp să mă specializez pe o anumită tehnică. Astfel, pe pagina mea veți găsi produse handmade din cele mai diverse categorii: jucării croșetate, cusute, hibrid, obiecte vestimentare și alte accesorii croșetate, tricouri pictate, decupaje din carton sau lemn, obiecte decorative din diverse materiale. Toate sunt însă, în marea majoritate, într-un singur exemplar, adică unicat.


Atelierul

Atelierul meu poate fi patul, atunci când croșetez, editez poze sau postez articole pe blog și pe pagina de Facebook, micul birou, atunci când am de cusut, pictat sau sculptat și chiar masa din bucătărie, când am nevoie de un spațiu mai mare, spre exemplu când folosesc mașina de decupat. De multe ori sunt însoțită în procesul de creație de asistentul meu personal, Tumbi.


Top 3

Prima cea mai frumoasă creație de până acum este păpușa făurită pentru Laura Baban, autoarea trilogiei ”Domnul Tic”. Inițial, a fost gândită ca produs menit să contribuie la strângerea de fonduri pentru publicarea celui de-al doilea volum al Laurei, însă cum amândouă ne-am implicat afectiv în realizarea acestei păpuși, în sensul în care am personalizat-o astfel încât să semene cu autoarea în ziua lansării, nu am mai putut-o pune spre vânzare.


De altfel, rochița păpușii a fost realizată chiar dintr-un ștergar brodar de bunica Laurei în urmă cu mai bine de 50 de ani, cum ar fi putut fi înstrăinat un astfel de obiect? Pentru următoarele locuri îmi este foarte greu să mă decid. Multe proiecte m-au solicitat nu doar fizic, ci și afectiv. Aș pune pe locul doi rochița deslușită din câteva schițe ale unei rusoaice. Tot din partea unei rusoaice am primit și complimente atunci când am purtat-o pentru prima dată, pe o plajă din Bulgaria – m-am simțit extrem de flatată.


Locul trei îl ofer cu mult drag unui papion solicitat de unul dintre studenții atemiști, purtat la ceremonia de absolvire.


Cum funcționează lucrurile

Pentru că sunt eu însămi o consumatoare înrăită de handmade, în principal lucrez pentru mine și apropiați. Dar atunci când mi s-a solicitat, am reprodus unele creații, cu mici schimbări față de produsul inițial în funcție de preferințe. Mi-ar plăcea ca pe viitor să fiu mai degrabă provocată să creez ceva nou, personalizat, decât să reproduc modele deja existente, fie ale mele, fie zărite prin diverse surse.


Prima comandă și profilul clienților 

Primul produs vândut a fost o eșarfă spiralată, unei persoane din cercul meu de cunoștințe. Pe vremea aceea nu mă gândeam că aș fi putut să vând. Încă sunt reticentă în privința asta, deși din când în când îmi permit să mai preiau câte o comandă. Selecția clienților se face automat, în sensul în care mulți spun ”nu îmi permit” și rămân în joc doar cei care înțeleg cu adevărat ce înseamnă un produs făcut de mână și prețuiesc în primul rând caracterul de produs unicat.

Handmade-ul de la noi: încotro?

Înțeleg că pentru fiecare artist adevărat, care investește necontenit în pregătirea lui, în îmbunătățirea și diversificarea produselor, se vor găsi clienții potriviți, chiar dacă la capitolul buget stăm ceva mai rău decât majoritatea celorlalte țări în care se încearcă promovarea curentului handmade. Doar că, personal, mi se pare că este destul de greu să te evidențiezi. Pe de altă parte, există mulți alți așa-ziși artiști care nu fac decât să reproducă. Obișnuită fiind cu prețurile artiștilor prezenți, spre exemplu, de la edițiile târgului ”Made in Ro” sau alte evenimente asemănătoare, privesc cu scepticism creațiile handmade cu mult mai ieftine decât le-aș aprecia eu însămi.


Cred că noi ca popor încă nu avem cultura handmade-ului; de când cu industrializarea, am pierdut legătura cu lucrurile făcute de mână, considerându-le desuete și respingându-le pentru că, nu-i așa, ne aduc aminte de ciorapii tricotați de bunica, câhhh, cine mai poartă așa ceva? De ce aș alege o jucărie de plastic când pot alege una croșetată, sau sculptată în lemn, sau cusută cu drag la mașină de cineva? De ce aș cumpăra mai multe căni imprimate kitchos de la supermarket când pot cumpăra una singură, însă pictată de mână, sau decorată manual? De ce aș tapeta pereții casei cu printuri ieftine când pot evidenția un colț de cameră printr-o pictură originală? Iar exemplele pot continua la nesfârșit. În plus, încep să înțeleg că responsabili pentru această lipsă de educație pot fi chiar cei care ar trebui să încurajeze și să dezvolte cultura, și anume organizatorii de târguri și evenimente. Artiștii și produsele acceptate în astfel de târguri nu mai sunt atent selectate, astfel încât la târguri de handmade ajung să fie vândute tot iile contrafăcute în detrimentul celor brodate de mână, tot jucăriile importate în locul celor realizate manual etc.

Promovare: online, offline

Am participat la câteva târguri: prima dată în 2014 și a doua oară chiar anul trecut; având însă puține produse (care nu s-au vândut) iar târgurile nefiind foarte bine evidențiate, nu mă încurajează să încerc prea curând o nouă experiență asemănătoare. Ca promovare în online am încercat câteva giveaway-uri, unele cu o mai mare rată de succes decât altele, în sensul în care am constatat că schimbarea politicilor Facebook legate de vizibilitatea paginilor îngreunează captarea atenției posibililor clienți interesați de ceea ce fac. Nici advertising-ul personalizat nu funcționează foarte bine în acest sens. Momentan, singura metodă nu doar la îndemână, ci și eficientă mi se par grupurile de handmade și cele de networking și promovare reciprocă.


Planurile de viitor pentru Papillon en Papier

Am atâtea planuri de viitor legate de acest proiect încât nici nu mai știu cum să îmi prioritizez activitățile, dar din păcate, trebuie să le înghesui în puținul timp liber pe care îl am după ce îmi îndeplinesc atribuțiile de serviciu. În primul rând, îmi doresc să măresc portofoliul de jucării croșetate – de-a lungul anilor am colecționat cu înverșunare nenumărate cărți, reviste și pattern-uri individuale încât a ajuns să-mi fie ciudă că am reușit până acum să fac atât de puțin din ce îmi închipuiam inițial că voi face. O altă idee pe care mi-aș dori-o implementată se referă la serii mici de jucării-unicat, care să marcheze diferite momente din viața unui copil – spre exemplu, prima zi de școală, prima mea jucărie, primul meu Crăciun etc. Nu în ultimul rând, am propus de curând unei prietene ilustratoare o colaborare care sună cam așa – ea să vină cu ilustrații originale ale unor personaje inedite, iar eu să încerc să le aduc la viață utilizând diferite tehnici și resurse pe care le am la dispoziție. Și pe lângă toate acestea, mi-ar plăcea să reușesc să scriu mai mult.